Sonos speakers are known for their crisp sound quality and ease of use, but like all electronics, they can degrade in performance or have faults. So can Sonos speakers be repaired and how do you do it?
Sonos speakers can be repaired by a third party or yourself, but in both cases, the warranty will be voided. You’ll need some basic electronics repair tools like a spudger, Torx screwdriver, and a soldering iron.
I’ll go through what the deal is with repairing a Sonos, and also give some tips on how to fix some common problems as well as some average prices for repair through repair stores.
Table of Contents
Sonos Doesn’t Have a Repair Service
Sonos doesn’t have an official repair service for you to drop your unit off and receive a fixed one. They also won’t provide replacement parts as they tend to just offer a full replacement of the unit.
When out of warranty, Sonos will generally offer refurbished Sonos speakers at a significantly reduced price, meaning you don’t have to wait for speakerless while your unit gets repaired.
Sonos will then take the returned unit and forward it to a repair center to get refurbished. While this is not officially stated by Sonos, customer reviews have stated that Sonos support has done so in the past.
One thing to keep in mind is that Sonos is not alone in this. The realities of mass production mean new units can be produced cheaply, in contrast to having to keep a repair center funded with parts and skilled labor.
(Even if Sonos doesn’t have a repair service, it is still a good brand. Here’s why!)
Unofficial Sonos Repair Services
Many HiFi-equipment and speaker repair stores exist to offer unauthorized or unofficial repairs for Sonos equipment.
There are local stores that you’ll need to find through local business directories or larger chains like iFixit that have a long history of providing electronics repair.
One example would be Sonos Repair based in the United Kingdom. Their business operates by sending return parcel labels to you that you print out and put on the Sonos, and then pay for the repair which they estimate at between 55 to 85 pounds (USD 68 to 105).
However, this is just an average quote and a proper diagnostic will be needed once they receive your Sonos unit and can estimate total repair costs.
You will also find many general repair stores for electronics that are able to repair Sonos speakers in the whole US.
Another way is to check for non-professionals who could do the service too. They are usually much cheaper, but you’ll be at some risk if the work isn’t done properly. Check their profile thoroughly. I’d use airtasker.com for this.
DIY Repair of Sonos
If you have some basic knowledge of electronics repair, there is a lot of information regarding the internals of Sonos speakers as well as repair guides online.
Keep in mind that if you access the internals of any Sonos speaker, it will automatically void the warranty and you cannot seek a refurbished unit or factory repair as per the usual processes.
You’ll need a soldering iron, screwdriver, spudger, or plastic opening tool. Amazon sells a wide range of electronics repair kits that contain many useful spudgers and opening tools to get at the internals of your Sonos.
For example, the Kaisi Professional Electronics Repair Kit contains 20 pieces including a pry tools kit made of both nylon and steel as well as two ESD tweezers.
One of the best resources for fixing a faulty Sonos speaker is iFixit, as they have a whole section dedicated to Sonos speakers.
For most of these repairs excluding the cost of replacement components, you can get the tools needed from about $10 to $40, and then you can expect most repairs to take anywhere from an hour to three hours.
Sonos Five: Malfunctions and Repairs
The drivers and woofers are some of the most common components to fail.
First, you’ll have to remove the protective cover using a pry or spudger tool to pop off the front grill slightly. Ensure that your tool is being wedged between the side of the casing and the rubber grill frame to not damage it, do not put the tool into the plastic mesh.
Free the grill all the way around, and it should expose the midwoofers. There are four T20 screws around the edge.
When disconnecting the driver, lightly pulling the driver should see the insulated terminal simply disconnect. However, for the non-insulated terminal, there’ll be a tab that must be depressed to free up the cable. Remove the mid-woofer from the unit and replace it.
Repeat the process for the rest of the drivers, but keep in mind that the center driver wires are very short, so I suggest that you make it a two-handed operation: one holding the driver while you disconnect the terminals with the other.
Sonos One: Malfunctions and Repairs
First, remove the rubber foot cover as well as undo the plastic screw guard on the bottom of the Sonos One, best done using a plastic opening tool.
Sonos uses Torx screws, so make sure you get a screwdriver that can handle them from the bottom of the speaker. You can’t use a normal screwdriver to remove these, so check Amazon for TEKPREM Torx Screwdrivers coming in T3, T4, T5, T6, T7, T8, T9, and T10 sizes.
Remove the bottom cover of the Sonos One by applying pressure to the side of the protective cover and pushing up with your fingers. This will reveal another Torx screw, so remove it and the protective cover clip, but be careful as this can be damaged easily.
Slide the protective cover upwards to remove and use a spudger to remove the covers that hide the screws by slipping it under them and lifting gently.
Remove the four Torx screws circling the control panel and then with the front of the unit facing you, lift the control panel up using your thumbs to expose a ribbon cable. This ribbon cable connects the control panel to the speaker and is very fragile.
Use a thin pry tool or plastic blade to work the flap loose and pull the ribbon out of its socket. Now you have the microphone and control panel component separated for replacement.
Sonos Playbase: Malfunctions and Repairs
First, turn the Playbase upside down and remove the bottom panel with a pry tool or opening tool. Insert the tool underneath the lip and pry upwards gently.
There is adhesive holding it shut, so use a heat gun to melt it slightly. Amazon has the SEEKONE 1800W Heat Gun perfect for this purpose, just make sure to put it on the lower setting and keep the heat gun slightly away from the unit.
There are a total of 43 Torx screws on the bottom, and of differing sizes, so take a photo of the bottom as well as put the three different types of screws into three containers.
This should free the metal plate, so pry it off and locate the main speaker array connection coming off the mainboard. A handy guide for identifying the connector can be found here.
The rest of the speaker array has connectors on the edge which must also be removed, and then you can remove the array to reveal the IR receiver underneath. Remove the ZIF connectors by first lifting the black tabs and then pulling the ribbon out.
Sonos Bridge: Malfunctions and Repairs
The Sonos Bridge’s most common issue is with the power port, which can be removed and replaced with an alternative.
The rubber bottom is attached with adhesive, meaning it can be pried off using a pry tool or thin flathead screwdriver. This will reveal screws in each corner of the base for a total of four screws.
The straight edges then have an indent that you can use as a pry tool to remove the plastic bottom off as well. Pry out the circuit board carefully by placing the spudger under the board, and aim for the side opposite the two ports.
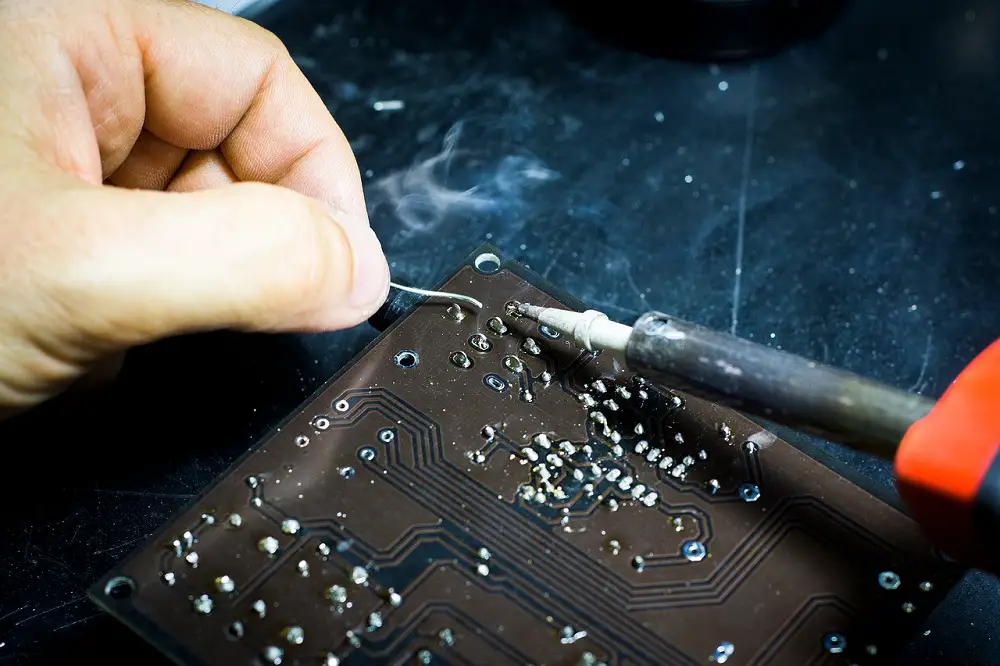
The power port is the black plastic housing next to the ethernet ports, and you can use a soldering iron to remove it on the flip side of the circuit board to enable a replacement to be soldered back on.
Do This Before Repairing Your Speaker
Before attempting any repairs to your Sonos speaker, you should always contact Sonos support so that they can offer some tips on how to fix it. As mentioned above, unauthorized repairs or DIY repairs will result in a voided warranty in most cases.
Part of this process will involve getting a diagnostic report generated and support will be able to walk you through this. Generally at this stage, support can determine whether troubleshooting will help or whether they should consider replacing the unit.
If you don’t want to contact Sonos, to do some basic repairs you’ll first want to power the unit down completely and remove the power cord if applicable, and then power it back up again. Remove it from the Sonos app and then reconnect it to see if that helps.
Make sure that the app is fully updated and fully charged, and you can try using the Sonosnet connection method instead of WiFi.
To connect your speakers via Sonosnet, connect at least one unit via an ethernet cable and put your other Sonos speakers near it.
Keep the units out of direct sunlight or very cold areas, it’s best to keep your Sonos at ambient room temperature. If it has been exposed to high or low temperatures for an extended period, try powering the device off and leave it in a cool place for 24 hours.